Top 10 Security Plugins For WordPress 2014
HL News • April 14, 2014
I wrote this article as a companion to my last post on WordPress security. While that article dealt with the nitty-gritty of modifying files by hand and picking a great password, I wanted this post to explore using plugins to increase security. Many of these top 10 security plugins for WordPress modify the .htaccess and wp-config.php files for you, and they do it behind the scenes; with a click of a button these plugins make it easier for most people to secure their site. With thousands of attacks unleashed daily against WordPress sites, it’s never too late to make your site secure. Do it Now! More attacks are sure to follow.

iThemes Security (Formerly Better WP Security)
iThemes recently hired the creator of Better WP Security, the original version of this plugin, full time to continue development. Way to go iThemes! With the creator working on this plugin full time, instead of just part time, it will continue to evolve at a rapid pace. This plugin packs A LOT of features into one package. It does just about everything that you would need a security plugin to do. We have used it on our personal sites and also on client sites. It comes in two versions; a free version, and a paid (Pro) version. They are both very similar with the Security Pro version having a few more features – soon to include, 2 factor authentication and Geo-IP banning.
Features of iThemes Security:
- Changes the URLs for WordPress dashboard areas including login, admin and more.
- Completely turns off the ability to login for a given time period.
- Removes the meta “Generator” tag.
- Renames “admin” account.
- Changes the ID on the user with ID 1.
- Changes the WordPress database table prefix.
- Enforces strong passwords for all accounts of a configurable minimum role.
- Prevents brute force attacks by banning hosts and users with too many invalid login attempts.
- Strengthens server security.
- AND many, many more!!
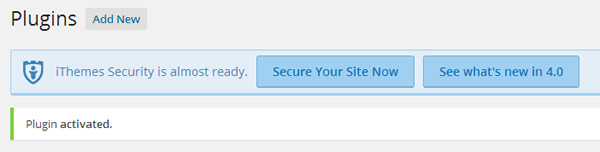
This plugin is very easy to install and set up. After you install the plugin you will see a banner on your plugins page. Click on the “Secure Your Site Now” button at the top.
After after you click the “Secure Your Site Now” button, a screen pops up and gives you the first steps to improving the security of your site. You will want to do all four of these steps, especially the first one.

After you’ve completed all four steps, you will see a “Security Status” page which lists all of the security items that iThemes Security would like to address, and along with each item is a easy to understand explanation of what is wrong with current security. To fix the items, simply click on the “Fix it” button on the the right. Super easy, right?
I recommend that you fix the high priority items immediately, then you can look through the medium and low priority items to see which ones you want to fix now and which ones you might want to come back and fix later. Why would you NOT want to fix some of the medium and low priority security items? Some may hinder you from working on your website or blog. A example of this would be the option that says, “Your WordPress Dashboard is available 24/7. Do you really update 24 hours a day? Consider using Away Mode.” Maybe you like to work on your website at different times day or night, so this option is one that you wouldn’t want to change. Another example is “Your WordPress Dashboard is using the default addresses. This can make a brute force attack much easier.” However some plugins, including security plugins, require the dashboard to be a the default address or they will not work.
Overall this plugin rocks, with the full time support of a great company, great programmers, incredible number of features, AND it being very easy to use. It scores a solid 10 for a security plugin. To learn more about this plugin check out the walk through below:
Walk Through of iThemes Security Pro
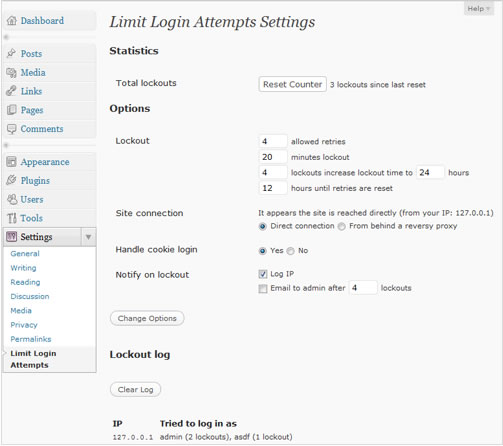
Limit Login Attempts
If you want a lighter-weight plugin that limits the amounts of login attempts on your website, try Limit Login Attempts. Why would you want to limit the amount of login attempts? To foil hackers of course. By default WordPress locks you out after 4 failed attempts for 20 minutes. With this plugin, if someone tries to login to your site and doesn’t know the username and/or password, they will get locked out after the number of attempts you specificy and for the amount of time that you specify. That way you can make it a real pain for hackers to use a brute force dictionary attack on your website.
Features of Limit Login Attempts:
- Limit the number of retry attempts when logging in (for each IP). Fully customizable
- Limit the number of attempts to log in using auth cookies in same way
- Informs user about remaining retries or lockout time on login page
- Optional logging, optional email notification
- Handles server behind reverse proxy
- Whitelist IPs using a filter.
Google Authenticator
Need two-step authentication (verification) for your website? Do you need it to be standards-based and widely used? Then try the Google Authenticator plugin by Henrik Schack for your WordPress website. There are a few Google Authenticator plugins out there, but this one is one of the best, it’s updated frequently and has been downloaded over 42,000 times. It even has a QR code with the secret key that you can scan into your phone. With the Google Authenticator plugin, each time you login to your website, you will need to input a code that shows up on your phone in the Google Authenticator app. This code is constantly changing, making it almost impossible for hackers to brute force their way into your website. You can download the app for your phone from the Apple Store or Google Play. The app even works with Google accounts (including Google Mail) and Microsoft accounts.
Here are the installation steps to get this plugin up and running on WordPress:
- Make sure your webhost is capable of providing accurate time information for PHP/WordPress, ie. make sure a NTP daemon is running on the server.
- Install and activate the plugin.
- Enter a description on the Users -> Profile and Personal options page, in the Google Authenticator section.
- Scan the generated QR code with your phone, or enter the secret manually, remember to pick the time based one.
- You may also want to write down the secret on a piece of paper and store it in a safe place.
- Remember to hit the Update profile button at the bottom of the page before leaving the Personal options page.
If you have problems with using the authentication code it may be because the time server that your webhost is using is out of sync with the correct time. To correct this, enable “relaxed mode” in the settings for the plugin, as this will enable codes that are valid by allowing up to a 4 min. time drift in each direction.
What is two-step authentication as it relates to the Google Authenticator service?
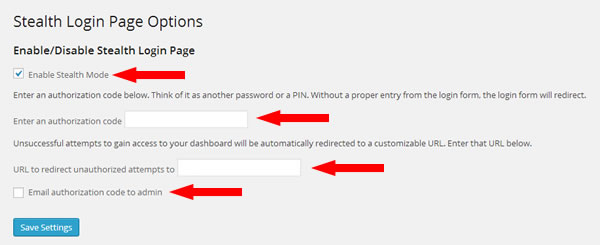
Stealth Login Page
Not sure why they call it “Stealth Login Page” as it doesn’t hide your login page or URL, but it does give your WordPress login screen an authorization code that you create. It’s a bit easier to set up than the Google Authenticator plugin mentioned earlier.
To set up the plugin go to to “Settings”, then click on “Stealth Login Page”. From the options page choose to “Enable Stealth Mode” then enter in a authorization code and a URL for the for people to be redirected to if they fail the login attempt.
There is also a optional box to email the authorization code to the admin after you have entered it. For hackers to gain entry into your WordPress installation by trying to guess your username and password, they now also have to guess a additional authorization code. This will eliminate most of the brute force username/password hacking attempts on your website.
After setting this plugin up this is what you will see the next time you login. A additional box has been added for you to type in your authorization code.
What if you forget your Authorization code? No worries, just login to your account via FTP and rename the Stealth Login folder in the wp-content/plugin directory. Then try and login again and you will see the Authorization code box is gone.
Akismet
If you have comments turned on, you’ve probably seen the hundreds (or thousands) of spam comments that you can get in a matter of days. This is really irritating, but what does spammy comments have to do with security or hackers? Hackers know that if they see a bunch of spammy comments on your site then the site probably doesn’t take security too serious either. Stop the spam before it gets posted by changing the settings under “Settings”, then “Discussion”, in the WordPress admin panel and then use this plugin. This plugin is included with your default WordPress installation but you may need to purchase the service in order for it to run. For personal sites that are non-commercial the service is FREE. For business and enterprise users the price can be as low as $5 a month. If you have deleted Akismet, you can download the plugin from the WordPress Plugin Directory.
Changing your WordPress discussion settings is the first step to getting the spammy comments under control.
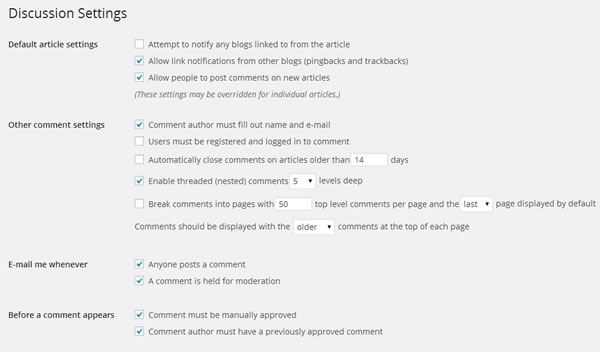
Make sure the following settings, at a minimum, are check-marked (they’re pretty self explanatory):
- Comment author must fill out name and email
- Email me whenever – Anyone posts a comment
- Email me whenever – A comment is held for moderation
- Before a comment appears – Comment must be manually approved (VERY important)
If you allow visitors to login to your site, I would also recommend checking the “Users must be registered and logged in to comment” – this can stop some of the automated spam. If you don’t want to allow people to comment on your blog posts, uncheck “Allow people to post comments on new articles”. Obviously this will stop ALL spam but it also stops people from leaving comments.
Remember that the “Allow people to post comments on new articles” setting can be overridden per post. So, if you notice that you are still getting spam on certain posts after unchecking the box, go into the post itself and make sure that the box is unchecked.
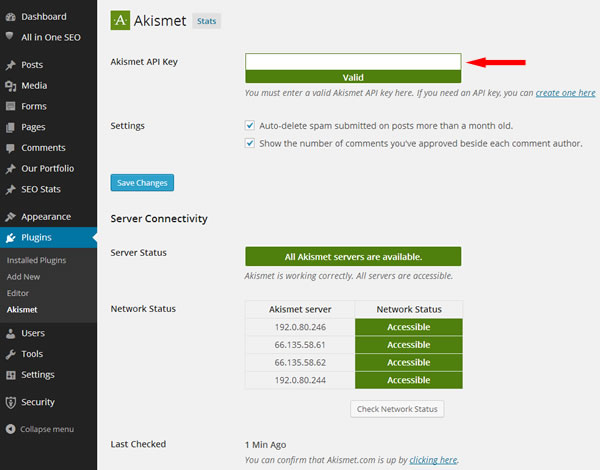
After getting the discussion settings under control, now is the time to start up the Akismet plugin. First go to Akismet.com, sign up for their service and get your API key. Then go into “Installed Plugins” and enable the plugin. After it is enabled type in your Akismet API Key, set the settings (there are only two) and click save changes. You will see a noticeable drop in spam comments coming in almost right away. You will still need to go in a delete spam comments from time to time, but there be fewer of them.
If you want to know more about it works, they have a features page that tells a little more about it.
WordPress Simple Firewall
The WordPress Simple Firewall plugin is simple to set up and has a lot of functionality. Not only does it protect your site like a firewall, but it also offers WordPress login protection, and comment spam protection.
Here are the 5 functions of this plugin:
Plugin Self-Protection
This plugins locks itself down – you can add access restriction to the plugin itself!
A Simple, Effective Firewall
Builds upon the simplicity and effectiveness of the WordPress Firewall 2 plugin.
WordPress Login Protection
Adds several layers of protection to the WordPress login screen through identity verification and Brute Force Login hacking prevention.
Comments and SPAM Protection
Uses and builds upon tried and tested SPAM prevention and filtering techniques with some unique approaches found only in this plugin.
WordPress Lockdown
Provides options for locking down your WordPress site from both legitimate users and people who may have gained unauthorized access.
As you can see this plugin offers a lot. It is updated frequently, compatible with the latest versions of WordPress and they resolve problems quickly in the support forum. They even have a great video introducing you to the features of the WordPress Simple Firewall.
All In One WP Security and Firewall
The All In One WP Security and Firewall plugin is perhaps the most comprehensive WordPress security plugin you can get. Its security rules are categorized into basic, intermediate and advanced. If you implement the basic rules, they should not “break” your site as they are non-invasive. The intermediate and advanced rules, if implemented, may break your site depending on the plugins you are using and the setup of your site. One of the unique features of this plugin is the “Security Strength Meter”. The meter tells you at a glance what level your security is at; if it’s in the red or yellow then you need to follow its recommendations and get the meter in the green.
Features of All In One WP Security and Firewall:
- User Account Security
- User Login Security
- User Registration Security
- Database Security
- Fire System Security
- Backup and Restore for your .htaccess and wp-config.php file
- Blacklist
- Firewall
- Brute Force Login Attack Prevention
- WhoIs Lookup
- Security Scanner
- Comment Spam Security
- And More!
Here’s a great three and half minute video about the plugin.
BulletProof Security
Wow, what to say… BulletProof Security is another security plugin that has tons of great features. There is a free version and a paid version (PRO). This tool works mainly by using the .htaccess file located on your server. The good part about that is the .htaccess file is the first file executed by your server when your website is loading.
Both of the versions have a lot of the same features including:
- Protection against XSS, Base64, and SQL code injection of your website.
- File and Folder Permission checking.
- Real Time Security Status displayed via a WordPress Dashboard alert.
- System Info including PHP info, MySQL info, PHP Memory Usage, Server OS and more.
- Security Log.
- Backup and Restore of .htaccess files.
- Login Security – including max attempts and lockout time.
The Pro version has all of the above plus:
- Anti-Spam.
- Website Performance Boosting.
- PHP.ini file creator and editor.
- PHP error log.
- Enhanced Security Monitoring including how you want alerts, warnings and error messages displayed.
- Email alerts when a administrator logs in or gets locked out. When a user gets locked out.
- AutoRestore
- Quarantine
- And More
This is the plugin if you take your website security SERIOUSLY. That being said, for the casual WordPress user, iThemes Security, WordPress Simple Firewall, or All In One Security and Firewall may be a better bet.
They do have a lot of great how to videos on using this plugin (especially PRO) on their website. Including this one on installation and setup:
Wordfence
Wordfence, it just sounds secure, doesn’t it? This plugin also comes in both free and paid versions (Premium). Wordfence includes a firewall, anti-virus scanning, malicious URL scanning and a very fast caching engine.
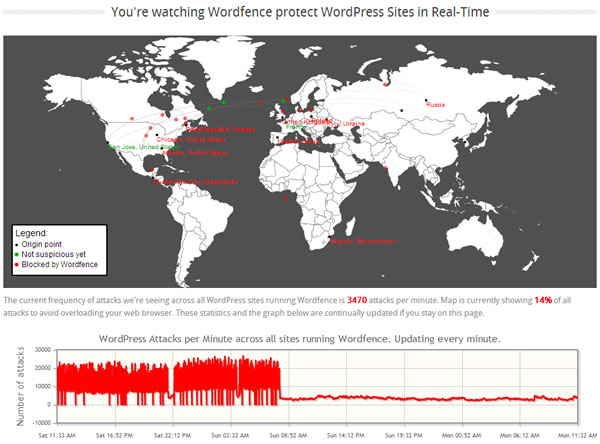
Visiting their website is a treat too. You can watch Wordfence protect WordPress sites around the world in real time! It uses little red and green markers to show you the traffic and it’s pretty cool seeing them bounce all around the map. On a serious note, it also shows a graph of the number of attacks on WordPress websites PER MINUTE that have taken place. This is usually between 5,000 and 30,0000 attacks per minute.
If you still are undecided on ramping up security on your WordPress site this should provide all the motivation you need.
The paid version includes two-step authentication with cellphone sign in, country blocking (you can now block a WHOLE country from trying to hack your site), scheduled scans of your website and premium support. Perhaps the best thing about Wordfence is that if your site ever gets hacked, it has the ability to repair your core WordPress files; this feature is included on both free and paid versions.
Login Security
The Login Security plugin is another light-weight plugin that improves the security of your login page against brute force attacks by logging every login attempt and letting you block the IP address. It’s best if you use this plugin in conjunction with another plugin like “Limit Login Attempts” (See above).
Features of the Login Security plugin:
- Records every login attempts (failed or successful). Can be used to tell you when a user logs in.
- Display all the failed or successful logins with the associated IP, User-Agent and HTTP referrer.
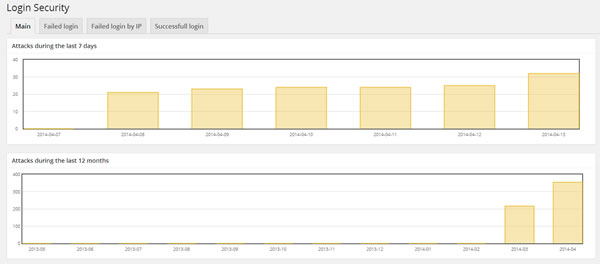
- Stats page – Number of failed logins during last 7 days and last 12 months.
- Discover which IP address tries the most to access your website.
- Ability to ban an IP address.
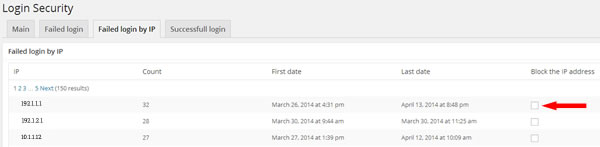
To begin using this plugin simply install it. After receiving either a notification from a plugin like “Limit Login Attempts”, a email saying a account has been locked (this will be from WordPress), or viewing the security plugin itself, use the “Failed Login” tab and “Failed login by IP” tab to block the offenders (most likely hackers).
 Use the “Failed login tab” to identify the attackers by IP address and the login name they tried to use.
If you do not recognize the IP address and login name that is trying to be used, then you can block the IP address by clicking the “Block the IP address box” opposite of the IP address they were trying to use. Before you do this go to the What Is My IP website and MAKE SURE that the IP listed does not match the IP you are going to block.
This plugin WILL NOT protect you against a brute force attack, but it will give you some indication that it is happening and then allow you to block the IP addresses. Please use one of the other WordPress security plugins in this post to protect yourself against such attack.
Have you been attacked? Do you have another favorite WordPress security plugin? Do you have questions about WordPress security? Let us know!