WordPress Security Tip Roundup – Things You Should Do To Protect Your WordPress Site
HL News • March 25, 2014
Sometimes its easy to forget about the security of your WordPress site. DON’T!!! Hackers are getting bolder everyday and WordPress is growing more popular. Sooner or later your site will be attacked. Here are 20 security tips for WordPress sites.
I guess you could call it a WordPress Security Tip Roundup (I started out wanting do just 5, but it grew from there). One thing to remember is no site is 100% hackproof, hackers will always try to find new ways to attack your site.

Security is always about trade offs; if you make your site uber secure then it will be difficult to administrate and hard to use all of the cool stuff that WordPress is known for, too wide open and the hackers will get in. It’s always a balancing act. Many times, by implementing just a few of these tips, the attackers will give up and try to attack another site; much like a animal attacking a turtle, they will give up and go for the easier meal.
Don’t use a username like admin or administrator to administer your site.
Make a longer, much more difficult to guess username. Use a combination of letters and numbers at least 8 characters long. Remember, longer is better; while it can be hard to remember, it will pay big dividends when you don’t have to recover a hacked site.
If you already have a account named admin, administrator, webmaster, or something obvious, then change it. Follow these steps to rename your ‘admin’ username:
-
- Log in as the ‘admin’ user
- Change the forget password email to another email account
- Create a new account with administrator rights
- Log out of the old account and log back in as the new “administrator” account
- Delete the old account or move its role down to Subscriber level.
There are ways that hackers can still find out your username, but by making it difficult it keeps out the casual hacker.
Don’t use easy to guess passwords.
Starting with WordPress 3.7 the password meter has been enhanced, try and make your passwords at least up to the level it says is “strong”. The new password meter can even recognize input that can weaken your passwords… including dates, names, and different keyboard input patterns. Your password should be at least 12 characters long; use at least one upper/lower case character, punctuation symbol, and number in your passwords. If it is hard for you to come up with a password, use a 3rd party password generator to make your passwords like Norton Identity Safe Password Generator.
For some people, it may just be easier to think of a passphrase, rather than a password that they can remember like “thebrowncowranawayto44thstreet”. Granted, it doesn’t have at least one upper case character or a punctuation symbol, but it does have a number and is 30 characters long. It is easy to remember but hard for the attackers to guess. There has been many thoughts on using passphrases rather than passwords, some security experts are for the idea and some are against.
Backup your data.
Out of site out of mind. You have your WordPress website or blog up and going, it looks the way you want it to, you’re getting some hits, you just installed a couple of new plugins. What’s to worry about? Stuff happens. Your database gets corrupted from installing those new plugins, you accidentally delete a few posts, somehow you blow away your theme, or the worst happens, you’re attacked by hackers! Always..ALWAYS make a backup before you change anything major on your system and make daily or weekly backups anyway. Most people hate to do anything extra, anything they do not HAVE to do. You can do it manually with these backup instructions. But why go through all of those steps when you hate backing up anyway? There are several great backup plugins on the market, some free, some paid.
Here are some freebies that you might check out:
-
- BackUpWordPress – One of the best free backup plugins, easy to use and works in low memory, shared hosting setups.
- Backup – This is one of the easiest to use and you can choose to store the backups on your server or on Google Drive.
- Updraft Plus – This one can backup to Dropbox, Google Drive, Rackspace Cloud, and Amazon S3 accounts. Plus it restore the files with a single click.
Here are some pay backup plugins:
-
- Vaultpress – Most blogs can get by with the Lite plan and at only $5 per month its a bargain.
- BackupBuddy – This one backs up your blogs and makes it easy to move to a new hosting company should you decide to.
- UpdraftPlus Premium – This one has everything and the kitchen sink, it is also Multisite Compatible.
Most hosting companies also include backups in their plan. If you’re thinking about using your hosting company to backup your website make sure that they do it on at least a weekly basis; the backups are easy to get to, they backup your database and at the same time they backup your files. Some hosting companies do not backup your database when they backup your files. Use a plugin like WP-DBManager to backup your database in that case. The downside is that most of the time you have no control over when the files are backed up, so it is impossible to make a backup before you update WordPress, a plugin or a theme.
Keep your WordPress installation,plugins, and themes updated.
This is very important! WordPress is often updated as are the plugins and themes because of security issues. Updates can be checked by logging in and clicking on Dashboard at the top of the menu. Below the Dashboard menu item, you will see the menu item Updates with a orange circle that has a number in it.

That number displayed in the circle is the total number of WordPress, Plugin, and Theme updates that are currently available. Click on “Updates” to see all of the relevant information. Make sure and backup your website before you update these. There is a chance that one or more of these updates will break your site. It is best to do them one at a time and make sure everything works.
With WordPress 3.7 and above, maintenance and security updates are automatically applied. Maintenance and security updates are those that are part of a revision number, for example 3.7.1 or 3.8.1, are not major release number like 3.7 or 3.8. The major releases e.g. 3.7, 3.8 are defined as core updates and are not automatically updated. Plugins and themes are not automatically updated. If you want to enable automatic updates for the WordPress core, plugins, or themes, then see the Configuring Automatic Background Updates page in the WordPress Codex.
Delete unused themes and plugins.
This one is simple. Just as you need to update themes and plugins you use, you need to delete any themes and plugins that you do not use. This minimizes the chance of any loopholes on your site for the hackers to use.
The users who login to your WordPress site should use the least privileged role that lets them get their job done.
If a person only edits other peoples posts and sometimes writes their own posts, give them the Editor role, don’t give them the Administrator role. If you want somebody to write their own posts, but you don’t want them to be able to publish them without you seeing them, then use the Contributor role. If you want the general public to log in, give them only the Subscriber role. These roles are set when you create the user and can be modified at any time, they can be accessed via the Users menu.
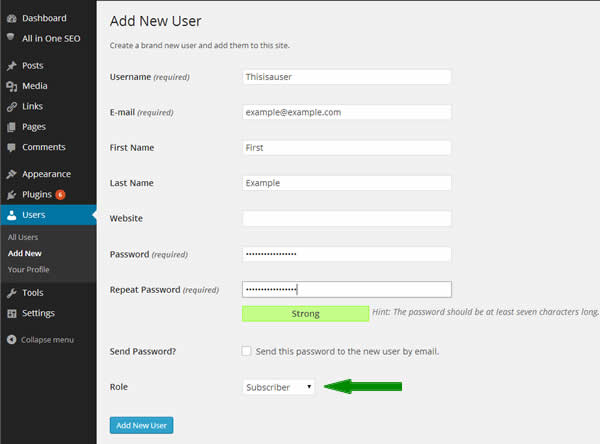
If you don’t want people trying to register to be a user on your website, uncheck the Membership box in the General Settings menu. Also in the General Settings menu the “New User Default Role” should never be set higher than Subscriber (at least not without a good reason).
Please see the Codex for a explanation of the roles in WordPress in regards to their capabilities.
Use trusted sources for your WordPress plugins and themes.
With tens of thousands of bad sites out there, make sure you get plugins and themes from reliable sources. Those sources would include wordpress.org and the theme creators themselves. If you are looking for a theme, and you know that the theme from the developer costs $49, and then you find a website who says that they have a free copy, RUN. Don’t download it, it very likely has malware installed in it that will help an attacker take over your website. Same goes for plugins. Even if a plugin is free, try to download it from WordPress.org first. If it isn’t available through WordPress.org, do some research, look at reviews, Google it. If you have ANY hesitation about it, RUN. Very often there is another similar plugin available through WordPress.org.
For added security you can use SFTP for connection security.
SFTP works just like FTP to upload your files, but it does so over a secure encrypted connection. Most hosting providers offer SFTP support, but you may have to contact them to set it up. A lot of the popular FTP programs support the use of SFTP, check on your favorite FTP programs webpage to see how to set it up.
To setup FileZilla click on File –>Site Manager

-
-
- In the Site Manager click on New Site.
- Type in a descriptive name for your server like, example.com SFTP.
- On the General tab type in your host name (sftp.example.com), you can leave the port blank unless your SFTP server uses a different port than the default one (port 22).
- On the protocol tab choose SFTP.
- Login type should be Normal.
- The user should be your username.
- Type in your password, then click connect.
-
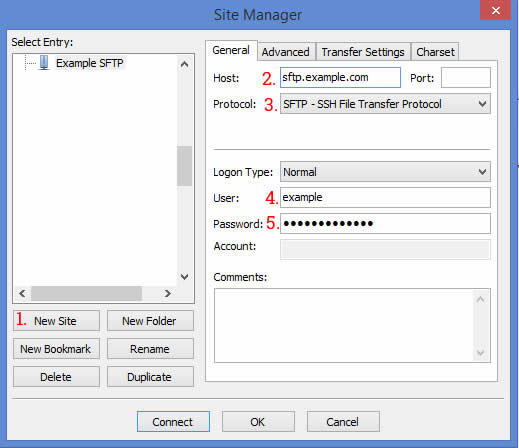
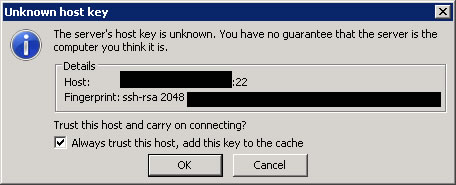
Accept the host key.
Your done. You should be able to transfer files like normal, but now the connection is secure and you don’t have to worry about hackers intercepting any of the files. If you have any trouble, contact your hosting company.
Advanced Security Measures
Caution! Most of following ideas require you to modify the .htaccess or wp-config.php file. If you do not feel comfortable doing this, please do not. Any changes to these file might result in your website being down or you no longer being able to login to the site. Please hire a WordPress professional to upgrade the security on your website.
Remember the .htaccess file can get overwritten by WordPress. You will need to make sure that the modifications to the file happen outside of the #BEGIN WordPress and the #END WordPress tags or they may get overwritten by changing the permalink structure or the loading of some plugins. IF you should ever lock yourself out, then simply delete the .htaccess file and FTP your backup back to the server.
Use the .htaccess file to restrict the IP address that can login to WordPress.
You will need to edit your .htaccess file. Download the .htaccess file for your site via FTP, back it up. Then add the following commands to that file. Insert your IP address or addresses into the file. If you don’t know your current IP address go to WhatsMyIP. Upload the new .htaccess file.
Replace the 127.0.0.1 with your IP address in the following example. If you are going to get into the website from more than one address, add a second or third allow command.
# Restrict Website Login to Certain IPs

 order deny,allow
 deny from all
 allow from 127.0.0.1

# End Restrict Website Login
I know the IP address of the person that is trying to hack my website, how do I block them?
You can block the person that is trying to hack the website with a simple change to your main WordPress directory .htaccess file. Download the .htaccess file, make a backup, then modify the file with the following code. Just change the IP address 192.168.1.1 to the IP address of your hacker. You can add additional IP addresses by adding in additional deny statements.
# IP Blocking #
order allow,deny
deny from 192.168.1.1
allow from all
Perhaps you have a bunch of IP addresses from the same subnet, how do you block them? In this example you will block all IP’s from the 192.168.1.0 subnet.
# IP Blocking #
order allow,deny
deny from 192.168.1.0/24
allow from all
Move the wp-config.php file one level higher in the directory structure.
Why would you want to protect this file? It has the path to your database, the database user name, the database user password and it has the authentication keys and salts that can be used for hijacking attacks. By moving the wp-config.php one directory level higher, hackers have a more difficult time getting at its contents. The good news is that WordPress handles the move right out of the box, no changes required. Backup your wp-config.php file via FTP or SFTP, copy it to the directory above your existing WordPress directory, then delete the old wp-config.php file.
If you want to move the file to a entirely different directory, other than the one directly above were it normally is, check out the article, “Is moving wp-config outside the web root really beneficial?” by Aaron Adams on StackExchange. He also goes into a lot of detail about why you would want to move the file.
Secret Keys, use them.
These secret keys aren’t on your key-ring, they are located in the wp-config.php file. As of version 2.7 of WordPress there are four security keys. These keys use random numbers, letters, and punctuation marks. They make your site much harder to hack and add random elements to the password. There are also four “salts”, the “salts” make it even harder to break passwords. Even though the WordPress installation by default gives you the keys and generates the salts, it is best if you generate new ones soon after your install WordPress. WordPress.org has a secret key and salt generator that you can use. Simply copy the contents of the page into your wp-config.php file overwriting the old keys and salts that are in there. People that are logged in will loose their connection, but they can log right back in. For more information on this check out “Editing wp-config.php” in the Codex. For a detailed explanation of salts check out Wikipedia.
Change the table prefix for WordPress.
The default table prefix is wp_. Many WordPress specific SQL injection attacks make the assumption that the default table prefix has not been changed. By changing the table prefix from the default you render many of the less sophisticated SQL injection attacks powerless. If you did not change this during the initial setup of your WordPress installation, there are a few steps and some work that needs to be done in order to do this. The article “How to Change the WordPress Database Prefix to Improve Security” at wpbeginner.com by Syed Balkhi has great step by step instructions.
Password protect the WordPress admin directory.
Yes, this means you will need to enter in a additional username and password to get to the administration panel of your WordPress website, but that is what security is all about, making it difficult for those hackers to get in. Use the tutorial “How to Password Protect Your WordPress Admin (wp-admin) Directory” over at wpbeginner.com to help with setting this up. In the tutorial they describe two ways to setup the password protection. The first way they show you is through cPanel, which a lot of hosting companies use. If you don’t have access to cPanel, the bottom part of the how-to describes setting it up manually. Make sure and do not forget to put the “ErrorDocument 401” command in your main .htaccess file and also the Ajax fix in your .htaccess file located in the wp-admin folder.
Kill PHP execution in some of your directories.
If the hackers cannot use the PHP language they could be dead in their tracks. You should probably only do this in your wp-includes and uploads directories. If you do it in other directories it could break plugins, themes, even your WordPress installation. Put the following commands in the .htaccess file for the directories that you want stop the execution of PHP in. If you don’t have one, you can create one with Notepad and FTP or SFTP it over.
#PROTECT [wp-includes]

 Order Allow, Deny
 Deny from all
Disable the editing in wp-admin.
This would make it so if somebody did login with the Administrator role, they could not edit any PHP files, including plugins and themes. To disable the editing, FTP or SFTP the wp-config.php file down to your computer, make a backup, modify the file and then upload it to your server. Input the line below in your wp-config.php file.
define('DISALLOW_FILE_EDIT', true);
If you find that this is too restrictive, simply take it out and re-upload your backup. Then log back in.
Make sure the permissions are set correctly on your directories and your files.
Almost all the time they should be set to 755 for directories and 644 for files. See the WordPress Codex “Changing File Permissions” for an explanation of permissions and how to change them.
Use a HTTPS SSL encrypted connection for the administration of your website.
You must have a SSL certificate to do this. To enforce the connection there are either one or two constants that have to be defined in the wp-config.php file depending on what you want to do. The first one is to force SSL logins.
define('FORCE_SSL_LOGIN', true);
This is used when you want to secure the logins so that usernames and passwords are not being sent encrypted. The second constant forces the admin sessions to use SSL.
define('FORCE_SSL_ADMIN', true);
When you use both of these together then not only is the login being encrypted but the admin area is being encrypted as well. Obviously using both together is the best way to secure your website. The WordPress Codex “Administration Over SSL” discusses this in a lot more detail, including using reverse proxies and virtual hosts.
There are some files that nobody should be able to access but you. It is important to lock these files down.
The files you will need to lock down are:
-
-
-
- readme.html
- license.txt
- install.php
- wp-config.php
-
-
The code that you need to use to lock down those files is very simple. The .htaccess file you need to modify is in the root directory of your WordPress install. Use FTP or SFTP to download the file, then make a backup and then re-upload the file.
# BEGIN Lock Down Files

Order allow,deny
Deny from all

# END Lock Down Files
Reuse this code to restrict all of the files mentioned above (just remember to change the name of the file). Don’t get too carried away, start with the list of files that I have above, or you may kill your website. If that happens just re-upload your backup and you are ready to go.
How did they get my username in the first place?!
One of the ways that hackers can get the username of the administrator is to run a simple browser query.
http://www.example.com/?author=1
The result of this query is either a 404 page from your website or the author archive page of the person that has in this case, ID #1. The URL of the author archive page has the username of the author in it. The first user of a website is by default ID #1 when the site is created, so it has the administrator role. Unless you have made another user administrator and lowered (or deleted) the first user, it still has administrator rights. For hackers knowing the first ID’s username, it’s a goldmine. They already have half of the security beat on a default WordPress site.
Put the code below in the root .htaccess file for your WordPress installation. It will block someone trying to get the first ID number via the browser query. As always, download and backup your .htaccess file before making any changes.
# BEGIN stop author scans

 RewriteEngine On
 RewriteBase /
 RewriteCond %{QUERY_STRING} (author=\d+) [NC]
 RewriteRule .* - [F]

# END stop author scans
If you have any questions or comments please post them or email me. Thank You.
Some great resources that inspired me to write this post:
“The Definitive Guide to WordPress Security” by Sam Roberts posted on Moz.com
“WordPress Security – Cutting Through The BS” by Tony Perez posted on Sucuri.net
“Hardening WordPress” from the Codex posted on the WordPress.org website
The articles “How to Change the WordPress Database Prefix to Improve Security” and “How to Password Protect Your WordPress Admin (wp-admin) Directory” at wpbeginner.com by Syed Balkhi